Ubuntu(22.04) + xampp(php 8.1)
□ Ubuntu 22.04.1 LTS Download
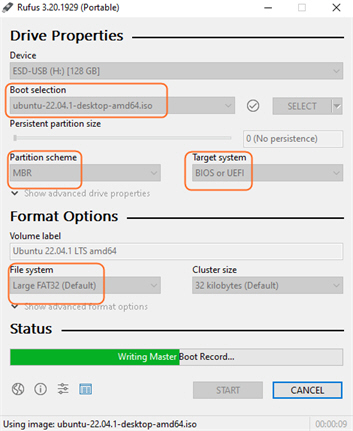
□ 부팅 가능한 USB 드라이브 만들기
https://rufus.ie/

□ USB부팅 Ubuntu 설치
- Erase disk and install Ubuntu / autologin check
□ 부팅USB메모리 제거 / Reboot / Software Auto Update
□ Linux - IP 주소 확인
ip addr
□ telnet 서버 설치
#sudo apt-get update
#sudo apt-get install xinetd telnetd
#nano /etc/xinetd.conf 아래 내용추가
※ 주의할점 : disable = no 와 같이 = 앞뒤로 공백(space) 넣어줘야 함(space 없으면 파라미터 미적용되어 텔넷접속안됨)
---------------------내용시작----------------------------------
# Simple configuration file for xinetd
#
# Some defaults, and include /etc/xinetd.d/
defaults
{
# Please note that you need a log_type line to be able to use log_on_success
# and log_on_failure. The default is the following :
# log_type = SYSLOG daemon info
}
includedir /etc/xinetd.d
service telnet
{
disable = no
flags = REUSE
socket_type = stream
wait = no
user = root
server = /usr/sbin/in.telnetd
log_on_failure = USERID
}
---------------------------내용 끝-------------------------------
#sudo /etc/init.d/xinetd restart
#sudo systemctl restart xinetd
#sudo systemctl enable xinetd //시스템에 계속사용 서비스 등록
#sudo ufw allow 23/tcp //23 텔넷포트 허용
- 지금부터는 telnet으로 접속하여 편하게 작업 -
□ XAMPP for Linux 7.4.33, 8.0.25 & 8.1.12 Download
https://www.apachefriends.org/download.html
[다운로드링크 확인 복사, 리눅스에서 wget으로 내려받기]
#wget https://sourceforge.net/projects/xampp/files/XAMPP%20Linux/8.2.0/xampp-linux-x64-8.2.0-0-installer.run
#chmod 755 xampp-linux-x64-8.1.12-0-installer.run
#./xampp-linux-x64-8.1.12-0-installer.run
-------------------------------------------------------------------------
Please wait while Setup installs XAMPP on your computer.
Installing
0% ______________ 50% ______________ 100%
#########################################
Setup has finished installing XAMPP on your computer.
------------------------------------------------------------------------
□ XAMPP 가동
#cd /opt/lampp/
#./xampp start <- root 권한으로 start (You need to be root to perform this action.)
-------------------------------
Starting XAMPP for Linux 8.1.12-0...
XAMPP: Starting Apache...ok.
XAMPP: Starting MySQL...ok.
XAMPP: Starting ProFTPD...ok.
-------------------------------
xampplib: line 22: netstat: command not found 메세지가 보이면
#sudo apt install net-tools 설치
[action 옵션 참고]
Usage: xampp <action>
start Start XAMPP (Apache, MySQL and eventually others)
startapache Start only Apache
startmysql Start only MySQL
startftp Start only ProFTPD
stop Stop XAMPP (Apache, MySQL and eventually others)
stopapache Stop only Apache
stopmysql Stop only MySQL
stopftp Stop only ProFTPD
reload Reload XAMPP (Apache, MySQL and eventually others)
reloadapache Reload only Apache
reloadmysql Reload only MySQL
reloadftp Reload only ProFTPD
restart Stop and start XAMPP
security Check XAMPP's security
enablessl Enable SSL support for Apache
disablessl Disable SSL support for Apache
backup Make backup file of your XAMPP config, log and data files
oci8 Enable the oci8 extenssion
panel Starts graphical XAMPP control panel
-------------------------------------------------------------------------
□ XAMPP가 PC리부트시 자동시작되도록 등록
# cd /etc/systemd/system
[etc/systemd/system 아래에 xampp.service 파일생성, 아래 녹색내용 붙혀넣기]
#nano xampp.service
---------내용시작---------------
[Unit]
Description=XAMPP
[Service]
ExecStart=/opt/lampp/lampp start
ExecStop=/opt/lampp/lampp stop
Type=forking
[Install]
WantedBy=multi-user.target
---------내용끝---------------
[자동시작 서비스 OS에 등록]
#systemctl enable xampp.service
[xampp 서비스 작동상태 확인]
#systemctl status xampp.service
---------------
○ xampp.service - XAMPP
Loaded: loaded (/etc/systemd/system/xampp.service; enabled; vendor preset: enabled)
Active: inactive (dead)
root@sbpc:/
....
908 "proftpd: (accepting connections)"
Dec 17 10:33:02 sbwindpc proftpd[908]: sbpc - ProFTPD 1.3.6 (stable) (built Tue Nov 22 2022 08:14:01 UTC) standalone mode STARTUP
--------------
위를 보면 Active: inactive (dead) 로 나온다. -> #reboot 를 해주고 리눅스 재시작
# systemctl status xampp.service
----------------
- xampp.service - XAMPP
Loaded: loaded (/etc/systemd/system/xampp.service; enabled; vendor preset: enabled)
Active: active (running) since Sat 2022-12-17 10:33:02 KST; 4min 47s ago
Process: 647 ExecStart=/opt/lampp/lampp start (code=exited, status=0/SUCCESS)
Tasks: 41 (limit: 4487)
Memory: 129.3M
--------------------
□ FTP 기본설정
[FPT는 별도 세팅없이 위 XAMPP에 proftpd가 기본적으로 설치되어 구동되고 있어 ftp 접속가능하였음]
- proftpd 폴더위치 : /opt/lampp/proftpd , /opt/lampp/var/proftpd
- proftpd.conf 파일위치 : /opt/lampp/etc/proftpd.conf
기본적으로 FTP접속해보면, 어떤 계정으로 접속하든지 /opt/lampp/htdocs 웹 루트 목록이 보임(웹서버 목적에서는 정상)
-> 각 유저 홈디렉토리만 접근가능하게 하려면 /opt/lampp/etc/proftpd.conf 파일에서 아래와 같이 주석처리 수정
# cd /opt/lampp/etc
# nano proftpd.conf
-------------------
# only for the web servers content
#DefaultRoot /opt/lampp/htdocs <- 주석처리
-------------------
[참고]
[proftpd] ftp연결시 상위 폴더에 접근제한
□ 디렉토리 위치
mysql 실행파일 => /opt/lampp/bin/mysql
mysql data 경로 => /opt/lampp/var/mysql/ 아래
phpmyadmin 스크립트 경로 => /opt/lampp/phpmyadmin/
httpd.conf/php.ini/my.cnf/proftpd/conf 경로 => /opt/lampp/etc/ 아래
XAMPP/LAMPP 엑스트라 설정모음 경로=> /opt/lampp/etc/extra/ 아래
# XAMPP
Include etc/extra/httpd-xampp.conf <--- /opt/lampp/etc/extra/httpd-xampp.conf
Include "/opt/lampp/apache2/conf/httpd.conf" <--- 빈값으로 의미없음
□ 기타
[htop 설치 모니터링]
sudo apt-get install htop
#htop
□ XAMPP 리눅스 설치 후 mysqladmin 외부 접속 허용(기본값은 보안상 서버 로컬에서만 접속가능)
#nano /opt/lampp/etc/httpd.conf
-----------------------------------------
<Directory />
AllowOverride none
#Require all denied
Require all granted
</Directory>
-----------------------------------------
#nano /opt/lampp/etc/extra/httpd-xampp.conf
-----------------------------------------
Alias /phpmyadmin "/opt/lampp/phpmyadmin"
<Directory "/opt/lampp/phpmyadmin">
AddDefaultCharset UTF-8
Order Allow,Deny <---- Allow, Deny (X) => 콤마 사이 공백 있으면 안됨.
Allow from All
</Directory>
-----------------------------------------
# systemctl restart xampp
□ 기본적인 웹서버(apm) 보안설정
1) 웹 접근시 디렉토리 목록보기(Indexes) 접근막기(Indexes 제거)
#nano /opt/lampp/etc/httpd.conf
-----------------------------------------
DocumentRoot "/opt/lampp/htdocs"
<Directory "/opt/lampp/htdocs">
Options Indexes FollowSymLinks ExecCGI Includes
# since XAMPP 1.4:
AllowOverride All
Require all granted
</Directory>
-----------------------------------------
2) 내부 용도(*.inc / *.cfg 등) 파일 웹(url) 접근막기
#nano /opt/lampp/etc/httpd.conf
-----------------------------------------
# prevent being viewed by Web clients. ex) db.inc / db.cfg ..웹접속불가
<Files ~ "^(.*\.bak|.*\.old|.*\.log|.*\.inc|.*\.db|.*\.cfg|.*\.con|.*\.cgi)$">
Require all denied
</Files>
# prevent .htaccess and .htpasswd files
<Files ".ht*">
Require all denied
</Files>
-----------------------------------------
3) 디렉토리 index 페이지 형태 결정(index.php / index.html 정도 사용)
#nano /opt/lampp/etc/httpd.conf
<IfModule dir_module>
#DirectoryIndex index.html
# XAMPP
#DirectoryIndex index.html index.html.var index.php index.php3 index.php4
DirectoryIndex index.php index.html
</IfModule>
□ mysql(mariaDB) root 암호 설정
#cd /opt/lampp/bin
#./mysql
MariaDB [(none)]> use mysql
set password for root@localhost=password('0123456789');
flush privileges;
[phpmyadmin 로그인방법 변경]
#cd /opt/lampp/phpmyadmin
#nano config.inc.php
----------------------------------------------
$cfg['blowfish_secret'] = 'blowfishsecretlinuxmintlinuxmint'; <- 문자열 32 char long.
/* Authentication type */
$cfg['Servers'][$i]['auth_type'] = 'cookie'; //config, cookie
$cfg['Servers'][$i]['user'] = 'root';
$cfg['Servers'][$i]['password'] = '';
------------------------------------------------


